C# Create Zip Archive
Zip Files with C#
Introduction
We use .zip files all of the time and Windows users have come to expect this functionality to be present in many applications. There are numerous third-party products available that we can use to create .zip archives and these include WinZip, PkZip, WinRar and others. It is generally understood that we can create a .zip archive from numerous files or directories on a hard drive and that the resulting zip archive is a single “file” with a .zip extension that contains the files and folders that we include. Zip files are good for storing and/or transferring files/folders for the following reasons:
- Since multiple files or folders can be “zipped” into a single file, we can simplify things by storing or transferring a single file and not many, many files. This is great for e-mail attachments, web-based file uploads/downloads and just simpler for both the packager and the recipient.
- Because zip files implement varying levels of compression, the size of the single zip file is less than the cumulative sizes of the files included in the zip file.
Creating a Zip File (Archive) via Windows 7
The Windows operating system provides .zip file functionality within My Computer. This is easily accomplished by selecting a folder or files, right-clicking, and selecting SendTo and Compressed (zipped) folder. See the illustration below.
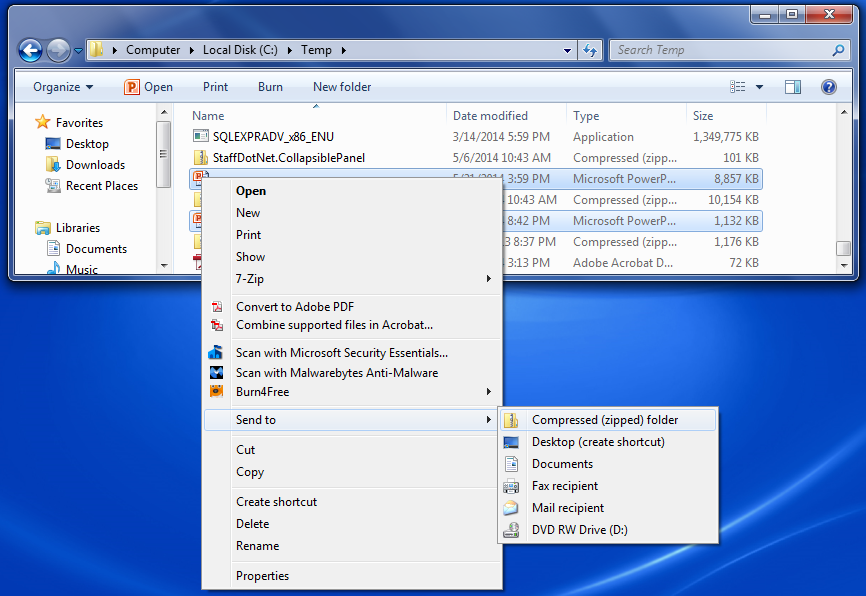
I’m sure that we’ve all done this at one time or another, right? Sure we have. Now, let’s take look at how we can create and work with the built-in Windows zip file/archive functionality provided by Windows via C# and the .NET Framework.
Creating and Working with Zip Files in C#
In .NET 4.5, there are classes in the System.IO.Compression namespace that allow developers to quickly and easily create and work with zip files and archives. These classes are listed below:
- ZipFile – provides static methods for creating, extracting, and opening zip files.
- ZipArchive – represents a package of compressed files in a zip format. Allows us to work with a collection of compressed files in a robust manner.
So, let’s just get going with some sample code!
Creating a Zip File – System.IO.Compression.ZipFile Class
The ZipFile class provides static methods that allow developers to programmatically work with zip archives. To use these methods, we have to first reference the System.IO.Compression.FileSystem assembly. The following little walkthrough will allow us to use the methods of the ZipFile class to work with a simple zip archive. Let’s create a new C# Console Application and call it ZipFileConsoleApplication. Once we’ve done that, let’s Add a Reference to the System.IO.Compression.FileSystem assembly. See the Add Reference dialog below.

Now that we have this reference, we need the following using statement to the head of our Program.cs class:
using System.IO.Compression;
We are now ready to jump into our static Main() method and start coding!
You can select any folder you desire for your code, but I am going to work with my c:\Temp\ZipSample folder and I am going to create two small Microsoft Word documents which I will name SampleDocument1 and SampleDocument2. These are just sample files – you can use any that you wish.
So, let’s write some code that creates a zip archive from my c:\Temp\ZipSamples folder.
static void Main(string[] args)
{
    //provide the folder to be zipped
    string folderToZip = @"c:\Temp\ZipSample";

    //provide the path and name for the zip file to create
    string zipFile = @"c:\Temp\ZipSampleOutput\MyZippedDocuments.zip";

    //call the ZipFile.CreateFromDirectory() method
    ZipFile.CreateFromDirectory(folderToZip, zipFile);
}
After we press F5 and run our console application, we can check our output folder and we will find our new .zip file.

Works like a champ and even better, it’s really simple to implement.
The ZipFile.CreateFromDirectory() method has a few overloads that are worth mentioning. The first one that we looked at was the simplest of the three available. The second overload allows us to also specify a CompressionLevel value. This enum has three members and they are listed below:
- NoCompression – this option specifies that no compression should be applied to the file.
- Fastest – this option results in an operation that takes the least amount of time, but the total level of compression is less.
- Optimal – this option results in an operation that provides the greatest level of compression, but in cases where there is a large number of files or subfolders, the compression operation will take more time.
This warrants some discussion. First, let’s recognize that when talking about compression, we are constantly forced to balance between the level of compression and the time required to produce the output. This is a tradeoff that is just inherent to the process. The CompressionLevel that you specify must be carefully chosen based on your scenario. An application that provides zip archive functionality could either allow the user to specify the compression level or it could dynamically specify it based on rules that you implement within the application. For example, your logic could assess the number of files, the disparity of file sizes (i.e. how many and how large), evaluate available disk space, and many other variables. Based on these “rules” that you would write, you could determine on the fly what compression strategy to use.
It is important to note here that the CompressionLevel enum does not give us control over how our files are compressed. There are extension methods in the ZipFileExtensions classes that allow us to do this if we so desire. I won’t go into too much detail about that here, but we do need to remember that our scenario should dictate which CompressionLevel we implement. Okay?
Now, armed with our knowledge of the additional overloads to the CreateFromDirectory() method and the existence of the CompressionLevel enum, let’s do three quick tests.
First, modify the last line of code (see sample code above) to utilize the second overload of the CreateFromDirectory() method, and let’s pick NoCompression for our CompressionLevel value. See below.
Test #1 – ZipFile.CreateFromDirectory() with CompressionLevel.NoCompression
static void Main(string[] args)
{
    //provide the folder to be zipped
    string folderToZip = @"c:\Temp\ZipSample";

    //provide the path and name for the zip file to create
    string zipFile = @"c:\Temp\ZipSampleOutput\MyZippedDocuments_NoCompression.zip";

    //call the ZipFile.CreateFromDirectory() method
    ZipFile.CreateFromDirectory(folderToZip, zipFile, CompressionLevel.NoCompression, false);

}
Press F5 and allow the application to run.
Test #2 – ZipFile.CreateFromDirectory() with CompressionLevel.Fastest
static void Main(string[] args)
{
    //provide the folder to be zipped
    string folderToZip = @"c:\Temp\ZipSample";

    //provide the path and name for the zip file to create
    string zipFile = @"c:\Temp\ZipSampleOutput\MyZippedDocuments_Fastest.zip";

    //call the ZipFile.CreateFromDirectory() method
    ZipFile.CreateFromDirectory(folderToZip, zipFile, CompressionLevel.Fastest, false);

}
Press F5 and allow the application to run.
Test #3 – ZipFile.CreateFromDirectory() with CompressionLevel.Optimal
static void Main(string[] args)
{
    //provide the folder to be zipped
    string folderToZip = @"c:\Temp\ZipSample";

    //provide the path and name for the zip file to create
    string zipFile = @"c:\Temp\ZipSampleOutput\MyZippedDocuments_Optimal.zip";

    //call the ZipFile.CreateFromDirectory() method
    ZipFile.CreateFromDirectory(folderToZip, zipFile, CompressionLevel.Optimal, false);

}
Press F5 and allow the application to run.
Now that we’ve used all three CompressionLevel values, let’s look at our output.

Since there were only two simple documents in my archive, the file sizes between Optimal and Fastest are the same. But look at the NoCompression zip file.
The key here is that as the number of files increases and the types of files becomes more diverse, you can expect to see greater and greater differences in file sizes when different CompressionLevel values used.
Extracting Files from a Zip File – System.IO.Compression.ZipFile.ExtractToDirectory() Method
In the same way that we easily created our zip file above, we can extract the contents of the zip archive to a folder that we specify. See the code below:
//specif the directory to which to extract the zip file
string extractFolder = @"c:\Temp\ZipSampleExtract\";

//call the ZipFile.ExtractToDirectory() method
ZipFile.ExtractToDirectory(zipFile, extractFolder);
After we press F5 and run the application, we now see the contents of our zip file extracted to the folder specified.

We’ve seen that with just a couple of simple method calls, we can create and extract a zip archive with C#.
The ZipFile class also has a couple of Load() method overloads which can be used to open a zip archive programmatically, but we are not going to discuss those in this article. Their implementation is very straightforward.
Working with Zip Archives – System.IO.Compression.ZipArchive Class
So what if we want to work with the individual entries within a zip archive? What if we want to read them and what if we want to add individual entries to a zip archive? What if we want to maybe selectively extract certain files and ignore others?
The ZipArchive class allows us to work with a package or collection of compressed files. To take this approach, you can do the following:
- Get a single entry (file) from the package using the GetEntry() method.
- Get an entire collection of entries (files) from the package using the Entries property.
- Create a new entry in the package by invoking one of the CreateEntry() overloads.
Let’s look back to the zip file that we created in the ZipFile class example above. We will write some code that uses the ZipArchive class to get the entries in that archive.
First, we need to Add a Reference to the System.IO.Compression assembly. See below.

If we remove all the code in our Program class’s static Main() method and replace it with this:
//we will use one of the zip archives we created in our previous example
string zipFile = @"C:\Temp\ZipSampleOutput\MyZippedDocuments_Optimal.zip";

//now we define the path to which we want to extract the files
string extractPath = @"C:\Temp\ZipSampleExtract";

//instantiate a ZipArchive object via the ZipFile.OpenRead method
ZipArchive zipArchive = ZipFile.OpenRead(zipFile);

//get the entries in the zip archive
if (zipArchive.Entries != null && zipArchive.Entries.Count > 0)
{
    //iterate through the Entries collection and extract each file
    //to the extraction folder
    foreach (ZipArchiveEntry entry in zipArchive.Entries)
    {
        //extract the entry to the output folder
        entry.ExtractToFile(System.IO.Path.Combine(extractPath, entry.FullName));
    }
}
When we take a look in our extraction folder, we see the extracted files!

Using ZipArchive Class to Zip Multiple Files
So what if we have a scenario where we need to create a zip archive that contains files from various locations across a hard drive or networked file shares? Let’s just write some sample code that will illustrate how to zip files individually.
//provide the folder to be zipped
string folderToZip = @"c:\Temp\ZipSample";

//provide the path and name for the zip file to create
string zipFile = @"c:\Temp\ZipSampleOutput\MyZippedDocuments2.zip";

//create an instance of a ZipArchive object by calling the
//ZipFile.Open method with a ZipArchiveMode of Create
using (ZipArchive zipArchive = ZipFile.Open(zipFile, ZipArchiveMode.Create))
{
    //since we are using our original folder with a couple
    //of sample Word documents, let's get a reference to those files
    //we are using the DirectoryInfo.GetFiles() method instead of
    //a simple Directory.GetFiles() method call because the latter
    //returns a string array and the former returns a FileInfo array.
    //With a FileInfo object, we can parse out the full path and
    //the simple file name quickly and easily with no custom code
    DirectoryInfo di = new DirectoryInfo(folderToZip);
    FileInfo[] filesToArchive = di.GetFiles();

    //defensive code always checks for null BEFORE executing
    if (filesToArchive != null && filesToArchive.Length > 0)
    {
        //iterate the filesToArchive string array
        foreach (FileInfo fileToArchive in filesToArchive)
        {
            //the first argument is the full path and filename
            //the second argument (entryName) is just the name of the file
            //the third argument is the CompressionLevel enum value
            zipArchive.CreateEntryFromFile(fileToArchive.FullName, fileToArchive.Name, CompressionLevel.Optimal);
        }
    }
}
Let’s talk about this briefly. First, we established the path containing the files we want to zip. Though this example only zips files in a single directory, the files could actually be scattered about in many directories. The key is that we establish the files to be zipped at some point.
Next, you’ll notice that we wrapped our code in a using block. In a nutshell, implementing a using statement, we can ensure that any object that implements the IDisposable interface is properly used and disposed of by the .NET runtime. Any managed type that accesses or uses unmanaged resources such as objects with the file system or fonts (just a couple of examples) should implement the IDisposable interface and it should be instantiated and used within the context of a using statement. We won’t go into detail regarding the hows and whys of the using statement, but just be aware that in a situation such as the sample above, it is a good practice to consume the ZipArchive via a using statement. Make sense?
Our invocation of the ZipFileExtensions.CreateEntryFromFile() method utilized the overload that accepts the full path and file name, a string name for the entry, and a CompressionLevel enum value. To learn more about the this method, this MSDN resource provides lots of good information.
This completes our look at ways to create and work with zip files (archives) with C# and the .NET Framework 4.5. There are many good resources available to help you learn more, but the samples we’ve gone through should give you most if not all that you need to implement zip file functionality within your C# applications. I will cover more System.IO functionality in future posts and I will update existing posts routinely.
Happy coding!
